Image by Author | ChatGPT
Machine learning has powerful applications across various domains, but effectively deploying machine learning models in real-world scenarios often necessitates the use of a web framework.
Django, a high-level web framework for Python, is particularly popular for creating scalable and secure web applications. When paired with libraries like scikit-learn, Django enables developers to serve machine learning model inference via APIs and also lets you build intuitive web interfaces for user interaction with these models.
In this tutorial, you will learn how to build a simple Django application that serves predictions from a machine learning model. This step-by-step guide will walk you through the entire process, starting from initial model training to inference and testing APIs.
Contents
# 1. Project Setup
We will start by creating the base project structure and installing the required dependencies.
Create a new project directory and move into it:
mkdir django-ml-app && cd django-ml-app
Install the required Python packages:
pip install Django scikit-learn joblib
Initialize a new Django project called mlapp and create a new app named predictor:
django-admin startproject mlapp .
python manage.py startapp predictor
Set up template directories for our app’s HTML files:
mkdir -p templates/predictor
After running the above commands, your project folder should look like this:
django-ml-app/
├─ .venv/
├─ mlapp/
│  ├─ __init__.py
│  ├─ asgi.py
│  ├─ settings.py
│  ├─ urls.py
│  └─ wsgi.py
├─ predictor/
│  ├─ migrations/
│  ├─ __init__.py
│  ├─ apps.py
│  ├─ forms.py        <-- we'll add this later
│  ├─ services.py     <-- we'll add this later (model load/predict)
│  ├─ views.py        <-- we'll update
│  ├─ urls.py         <-- we'll add this later
│  └─ tests.py        <-- we'll add this later
├─ templates/
│  └─ predictor/
│     └─ predict_form.html
├─ manage.py
├─ requirements.txt
└─ train.py           <-- Machine learning training script
# 2. Train the Machine Learning Model
Next, we will create a model that our Django app will use for predictions. For this tutorial, we will work with the classic Iris dataset, which is included in scikit-learn.
In the root directory of the project, create a script named train.py. This script loads the Iris dataset and splits it into training and testing sets. Next, it trains a Random Forest classifier on the training data. After training is complete, it saves the trained model along with its metadata—which includes feature names and target labels—into the predictor/model/ directory using joblib.
from pathlib import Path
import joblib
from sklearn.datasets import load_iris
from sklearn.ensemble import RandomForestClassifier
from sklearn.model_selection import train_test_split

MODEL_DIR = Path("predictor") / "model"
MODEL_DIR.mkdir(parents=True, exist_ok=True)
MODEL_PATH = MODEL_DIR / "iris_rf.joblib"

def main():
    data = load_iris()
    X, y = data.data, data.target

    X_train, X_test, y_train, y_test = train_test_split(
        X, y, test_size=0.2, random_state=42, stratify=y
    )

    clf = RandomForestClassifier(n_estimators=200, random_state=42)
    clf.fit(X_train, y_train)

    joblib.dump(
        {
            "estimator": clf,
            "target_names": data.target_names,
            "feature_names": data.feature_names,
        },
        MODEL_PATH,
    )
    print(f"Saved model to {MODEL_PATH.resolve()}")

if __name__ == "__main__":
    main()
Run the training script:
If everything runs successfully, you should see a message confirming that the model has been saved.
# 3. Configure Django Settings
Now that we have our app and training script ready, we need to configure Django so it knows about our new application and where to find templates.
Open mlapp/settings.py and make the following updates:
- Register the
predictorapp inINSTALLED_APPS. This tells Django to include our custom app in the project lifecycle (models, views, forms, etc.). - Add the
templates/directory in theTEMPLATESconfiguration. This ensures Django can load HTML templates that are not tied directly to a specific app, like the form we will build later. - Set
ALLOWED_HOSTSto accept all hosts during development. This makes it easier to run the project locally without host-related errors.
from pathlib import Path

BASE_DIR = Path(__file__).resolve().parent.parent

INSTALLED_APPS = [
    "django.contrib.admin",
    "django.contrib.auth",
    "django.contrib.contenttypes",
    "django.contrib.sessions",
    "django.contrib.messages",
    "django.contrib.staticfiles",
    "predictor",  # <-- add
]

TEMPLATES = [
    {
        "BACKEND": "django.template.backends.django.DjangoTemplates",
        "DIRS": [BASE_DIR / "templates"],  # <-- add
        "APP_DIRS": True,
        "OPTIONS": {
            "context_processors": [
                "django.template.context_processors.debug",
                "django.template.context_processors.request",
                "django.contrib.auth.context_processors.auth",
                "django.contrib.messages.context_processors.messages",
            ],
        },
    },
]

# For dev
ALLOWED_HOSTS = ["*"]
# 4. Add URLs
With our app registered, the next step is to wire up the URL routing so users can access our pages and API endpoints. Django routes incoming HTTP requests through urls.py files.
We’ll configure two sets of routes:
- Project-level URLs (
mlapp/urls.py) – includes global routes like the admin panel and routes from thepredictorapp. - App-level URLs (
predictor/urls.py) – defines the specific routes for our web form and API.
Open mlapp/urls.py and update it as follows:
# mlapp/urls.py
from django.contrib import admin
from django.urls import path, include

urlpatterns = [
    path("admin/", admin.site.urls),
    path("", include("predictor.urls")),  # web & API routes
]
Now create a new file predictor/urls.py and define the app-specific routes:
# predictor/urls.py
from django.urls import path
from .views import home, predict_view, predict_api

urlpatterns = [
    path("", home, name="home"),
    path("predict/", predict_view, name="predict"),
    path("api/predict/", predict_api, name="predict_api"),
]
# 5. Build the Form
To let users interact with our model through a web interface, we need an input form where they can enter flower measurements (sepal and petal dimensions). Django makes this easy with its built-in forms module.
We will create a simple form class to capture the four numeric inputs required by the Iris classifier.
In your predictor/ app, create a new file called forms.py and add the following code:
# predictor/forms.py
from django import forms

class IrisForm(forms.Form):
    sepal_length = forms.FloatField(min_value=0, label="Sepal length (cm)")
    sepal_width  = forms.FloatField(min_value=0, label="Sepal width (cm)")
    petal_length = forms.FloatField(min_value=0, label="Petal length (cm)")
    petal_width  = forms.FloatField(min_value=0, label="Petal width (cm)")
# 6. Load Model and Predict
Now that we have trained and saved our Iris classifier, we need a way for the Django app to load the model and use it for predictions. To keep things organized, we will place all prediction-related logic inside a dedicated services.py file in the predictor app.
This ensures that our views stay clean and focused on request/response handling, while the prediction logic lives in a reusable service module.
In predictor/services.py, add the following code:
# predictor/services.py
from __future__ import annotations
from pathlib import Path
from typing import Dict, Any
import joblib
import numpy as np

_MODEL_CACHE: Dict[str, Any] = {}

def get_model_bundle():
    """
    Loads and caches the trained model bundle:
    {
      "estimator": RandomForestClassifier,
      "target_names": ndarray[str],
      "feature_names": list[str],
    }
    """
    global _MODEL_CACHE
    if "bundle" not in _MODEL_CACHE:
        model_path = Path(__file__).resolve().parent / "model"https://www.kdnuggets.com/"iris_rf.joblib"
        _MODEL_CACHE["bundle"] = joblib.load(model_path)
    return _MODEL_CACHE["bundle"]

def predict_iris(features):
    """
    features: list[float] of length 4 (sepal_length, sepal_width, petal_length, petal_width)
    Returns dict with class_name and probabilities.
    """
    bundle = get_model_bundle()
    clf = bundle["estimator"]
    target_names = bundle["target_names"]

    X = np.array([features], dtype=float)
    proba = clf.predict_proba(X)[0]
    idx = int(np.argmax(proba))
    return {
        "class_index": idx,
        "class_name": str(target_names[idx]),
        "probabilities": {str(name): float(p) for name, p in zip(target_names, proba)},
    }
# 7. Views
The views act as the glue between user inputs, the model, and the final response (HTML or JSON). In this step, we will build three views:
- home – Renders the prediction form.
- predict_view – Handles form submissions from the web interface.
- predict_api – Provides a JSON API endpoint for programmatic predictions.
In predictor/views.py, add the following code:
from django.http import JsonResponse
from django.shortcuts import render
from django.views.decorators.http import require_http_methods
from django.views.decorators.csrf import csrf_exempt  # <-- add
from .forms import IrisForm
from .services import predict_iris
import json


def home(request):
    return render(request, "predictor/predict_form.html", {"form": IrisForm()})


@require_http_methods(["POST"])
def predict_view(request):
    form = IrisForm(request.POST)
    if not form.is_valid():
        return render(request, "predictor/predict_form.html", {"form": form})
    data = form.cleaned_data
    features = [
        data["sepal_length"],
        data["sepal_width"],
        data["petal_length"],
        data["petal_width"],
    ]
    result = predict_iris(features)
    return render(
        request,
        "predictor/predict_form.html",
        {"form": IrisForm(), "result": result, "submitted": True},
    )


@csrf_exempt  # <-- add this line
@require_http_methods(["POST"])
def predict_api(request):
    # Accept JSON only (optional but recommended)
    if request.META.get("CONTENT_TYPE", "").startswith("application/json"):
        try:
            payload = json.loads(request.body or "{}")
        except json.JSONDecodeError:
            return JsonResponse({"error": "Invalid JSON."}, status=400)
    else:
        # fall back to form-encoded if you want to keep supporting it:
        payload = request.POST.dict()

    required = ["sepal_length", "sepal_width", "petal_length", "petal_width"]
    missing = [k for k in required if k not in payload]
    if missing:
        return JsonResponse({"error": f"Missing: {', '.join(missing)}"}, status=400)

    try:
        features = [float(payload[k]) for k in required]
    except ValueError:
        return JsonResponse({"error": "All features must be numeric."}, status=400)

    return JsonResponse(predict_iris(features))
# 8. Template
Finally, we will create the HTML template that serves as the user interface for our Iris predictor.
This template will:
- Render the Django form fields we defined earlier.
- Provide a clean, styled layout with responsive form inputs.
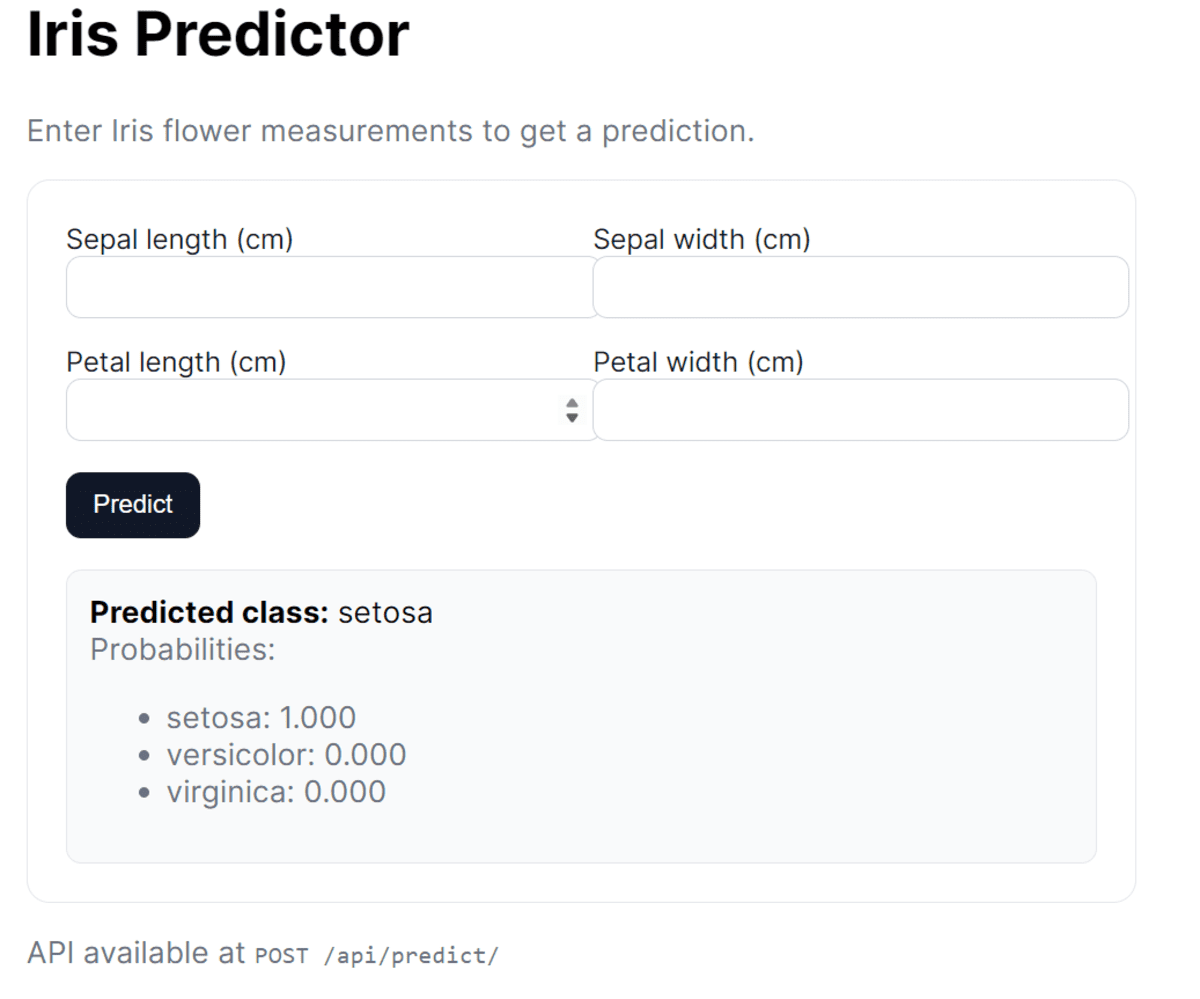
- Display prediction results when available.
- Mention the API endpoint for developers who prefer programmatic access.
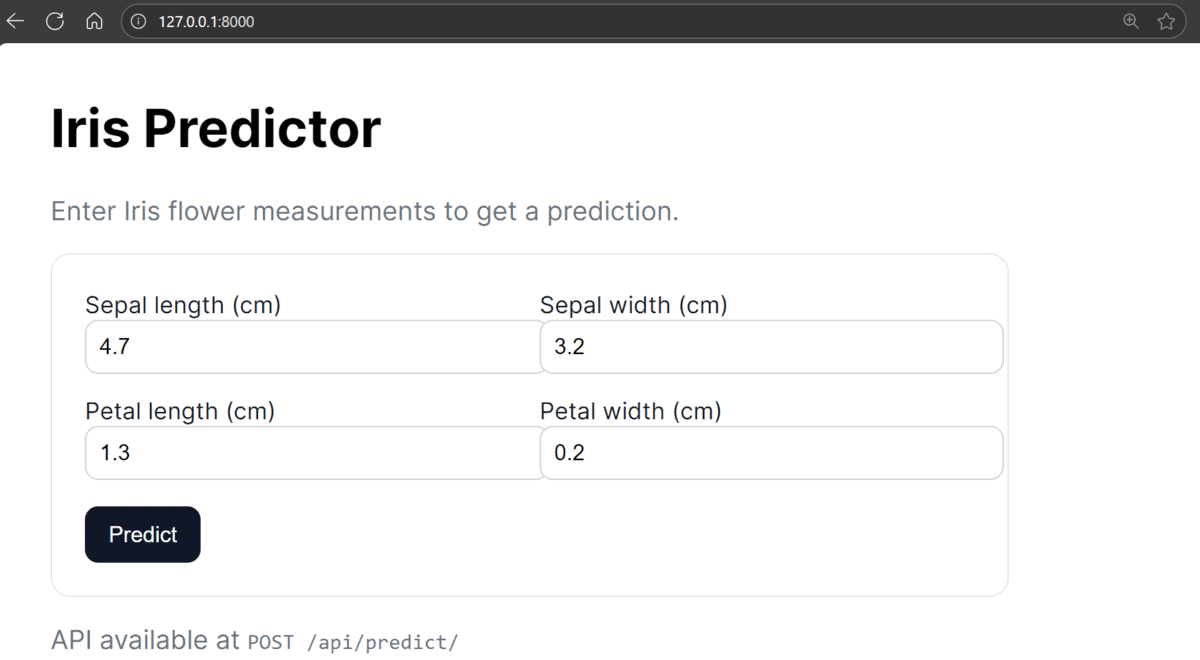
Iris Predictor
Enter Iris flower measurements to get a prediction.
{% if submitted and result %}
Predicted class: {{ result.class_name }}
Probabilities:
{% for name, p in result.probabilities.items %}
- {{ name }}: {{ p|floatformat:3 }}
{% endfor %}
{% endif %}
API available at POST /api/predict/
# 9. Run the Application
With everything in place, it’s time to run our Django project and test both the web form and the API endpoint.
Run the following command to set up the default Django database (for admin, sessions, etc.):
Launch the Django development server:
python manage.py runserver
If everything is set up correctly, you will see output similar to this:
Watching for file changes with StatReloader
Performing system checks...

System check identified no issues (0 silenced).
September 09, 2025 - 02:01:27
Django version 5.2.6, using settings 'mlapp.settings'
Starting development server at http://127.0.0.1:8000/
Quit the server with CTRL-BREAK.
Open your browser and visit: http://127.0.0.1:8000/ to use the web form interface.


You can also send a POST request to the API using curl:
curl -X POST http://127.0.0.1:8000/api/predict/
  -H "Content-Type: application/json"
  -d '{"sepal_length":5.1,"sepal_width":3.5,"petal_length":1.4,"petal_width":0.2}'
Expected response:
{
  "class_index": 0,
  "class_name": "setosa",
  "probabilities": {
    "setosa": 1.0,
    "versicolor": 0.0,
    "virginica": 0.0
  }
}
# 10. Testing
Before wrapping up, it is good practice to verify that our application works as expected. Django provides a built-in testing framework that integrates with Python’s unittest module.
We will create a couple of simple tests to make sure:
- The homepage renders correctly and includes the title.
- The API endpoint returns a valid prediction response.
In predictor/tests.py, add the following code:
from django.test import TestCase
from django.urls import reverse

class PredictorTests(TestCase):
    def test_home_renders(self):
        resp = self.client.get(reverse("home"))
        self.assertEqual(resp.status_code, 200)
        self.assertContains(resp, "Iris Predictor")

    def test_api_predict(self):
        url = reverse("predict_api")
        payload = {
            "sepal_length": 5.0,
            "sepal_width": 3.6,
            "petal_length": 1.4,
            "petal_width": 0.2,
        }
        resp = self.client.post(url, payload)
        self.assertEqual(resp.status_code, 200)
        data = resp.json()
        self.assertIn("class_name", data)
        self.assertIn("probabilities", data)
Run the following command in your terminal:
You should see output similar to this:
Found 2 test(s).
Creating test database for alias 'default'...
System check identified no issues (0 silenced).
..
----------------------------------------------------------------------
Ran 2 tests in 0.758s

OK
Destroying test database for alias 'default'...
With these tests passing, you can be confident your Django + machine learning app is functioning correctly end-to-end.
# Summary
You have successfully created a complete machine learning application using the Django framework, bringing all components together into a functional system.
Starting with training and saving a model, you integrated it into Django services for making predictions. You also built a clean web form for user input and exposed a JSON API for programmatic access. Additionally, you implemented automated tests to ensure the application runs reliably.
While this project focused on the Iris dataset, the same structure can be extended to accommodate more complex models, larger datasets, or even production-ready APIs, making it a solid foundation for real-world machine learning applications.
Abid Ali Awan (@1abidaliawan) is a certified data scientist professional who loves building machine learning models. Currently, he is focusing on content creation and writing technical blogs on machine learning and data science technologies. Abid holds a Master’s degree in technology management and a bachelor’s degree in telecommunication engineering. His vision is to build an AI product using a graph neural network for students struggling with mental illness.
